Tuesday, December 29, 2009
Warm Carrot Muffins
In the last two months, I've made plenty of cookies (mint chocolate, sugar, molasses, ginger-lemon), spicy chipotle short ribs, a tasty turnip gratin, garlic tomato soup, pork chorizo burgers, the best roasted potatoes, Thai coconut soup, and today, some warm carrot muffins. I wish I could share everything with you but I'll have to save most of them for another day. The muffins are at the forefront today.
They're called Happy Morning Muffins and come from Small Batch Baking, a cookbook that has yet to fail me. It has produced bacon biscuits that are savory and buttery and made with bacon fat, and infused with bacon flavor. The almond crumble from this book is my go to dessert when I want to make something quick in a single ramekin, and doubles or triples well for a group. And yesterday I grated some carrots and chopped some pineapple, and mixed up some batter to bake this happy morning when I'm not at work and looking forward to beautiful day because the sun is out for the first time in weeks!
The muffins are displayed on my brand new cake stand (thanks Moe!) and I think they could have come right out of the bakery case. They are moist from all the pineapple and carrot, and spiced with cinnamon and vanilla. You can mess around with the ingredients, vary the nuts, use apple instead of pineapple, or other dried fruits instead of raisins. Whatever makes you happy.
Happy Morning Muffins
I altered the original recipe so this one makes 10-12 small muffins, which really make an appropriate serving size (but you might feel like eating more than one...)
Ingredients:
1 cup all-purpose flour
1/2 tsp baking powder
1/2 tsp baking soda
1/4 tsp salt
1 tsp ground cinnamon
1/2 cup plus 2 tablespoons sugar
2 eggs
1/2 cup vegetable oil
1 tsp vanilla extract
4 tablespoons canned crushed pineapple, or fresh chopped in a food processor
1 cup coarsely grated carrots
1/2 cup chopped nuts (pecans or walnuts)
4 tablespoons raisins
2 tablespoons sweetened flaked coconut
10 - 12 small muffin cups
Preheat the oven to 350 degrees F. Place a fine-mesh sieve over a large mixing bowl. Place the flour, baking powder, baking soda, salt, and cinnamon in the sieve and sift the ingredients into the bowl.
Place the sugar, eggs, oil, and vanilla in a small bowl and whisk to blend. Stir in the crushed pineapple. Add the wet ingredients to the flour mixture all at once, and stir just until the dry ingredients are moistened. Then stir in the carrots, nuts, raisins, and coconut.
Arrange the muffin cups in a muffin pan or on a baking sheet. Spoon the batter into the muffin cups, filling them about three-quarters of the way.
Bake the muffins until a toothpick inserted in the center of one comes out clean, 28 to 30 minutes. Remove and cool 10-15 minutes before serving. They are best served warm or will keep one day in a plastic bag at room temperature.
Friday, November 6, 2009
Camp Cooking
So here's a couple of things you can do that taste really good when camping - or any time.
1. Veggie quesadillas for breakfast - Tortillas, monterey jack cheese, sauteed zucchini and onions - serve with salsa.
2. Cream cheese with roasted red peppers on crackers appetizer - use bottled roasted red peppers, dump onto a block of cream cheese and serve with crackers or wheat thins. Awesome.
3. Bake a cake in a Dutch oven - add canned peaches or pineapple to a box cake mix in a Dutch oven. Put heated charcoal briquettes underneath and covering the top and bake for allotted time or slightly longer. It's really good for breakfast the next day too.
4. Make an avocado and cheese sandwich. Fresh avocado, monterey jack, tomatoes and onions on a bread roll.
5. Serve hot sauce with everything.
This is what cooking looks like on an island in Baja:
Sunday, October 18, 2009
It Must Be Fall
Usually at this time of year, I'm doing delicious things with pumpkins. Legal things, I assure you. For example, pumpkin soup makes a hearty fall meal. I'll buy cans of pumpkin for pumpkin bread duels. Is pumpkin bread better light and spicy or full of chocolate chips? Chocolate lovers are easily swayed by the chips but the spiced bread ended up with more votes. The one redeeming factor of fall has always been pumpkin.
But when I went looking for canned pumpkin, it was sold out, and the local market was too small to carry it. I was eager to make a bread that was warm and spicy and went well with tea. So I turned to another squash. Zucchini is a summer squash, one that doesn't get much as much attention as the pumpkin. It doesn't get carved with eyes, nose, and mouth, it doesn't get baked into a famous holiday pie. The humble zucchini doesn't have a strong personality. By itself, it can make a lovely, light salad tossed with lemon and olive oil and oregano, or it can be sauteed and drizzled with honey. But blended into a bread flavored with cinnamon, it melts away. So you can tell yourself you're eating healthy. You know you put a whole squash in there because it will look like it's all zucchini when it goes into the oven. You'd never know it when it comes out, moist and not too sweet, with a crunchy crust. The summer zucchini, like the trees around here, has lost its green.
Zucchini Bread
makes 2 loaves
3 cups all-purpose flour
1 teaspoon salt
1 teaspoon baking soda
1 teaspoon baking powder
2 1/2 teaspoons ground cinnamon
3 eggs
1 cup vegetable oil
2 1/4 cups white sugar
3 teaspoons vanilla extract
2 cups shredded zucchini
Thursday, October 15, 2009
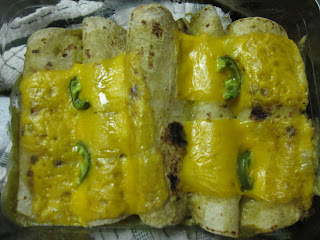
Green Olive Enchiladas
Ask yourself the next time your spouse or roommate makes you dinner, and you take it as a kind gesture, but then get stuck with the dishes, did you just get played?
Kristen used to make an easy green olive enchilada dish, and it's so tasty when you are looking for something vegetarian that is not pasta with red sauce. It's perfect for grad students with no time and little money, who want to cook enough for leftovers and for that ingrate roomie who will get stuck scraping the cheese out of the baking pan.
Green Olive Enchiladas
Makes 12 enchiladas, 4 servings of 3 enchiladas each
1 cup chopped onion
1 cup sliced green pimiento stuffed olives
1 cup shredded pepper jack cheese
1/2 tablespoon flour
12 corn tortillas
1 10 ounce can green chile enchilada sauce
1/2 cup shredded cheddar
Sliced jalapeno (optional)
Mix onion, olives, pepper jack cheese, and flour in a large bowl. Preheat oven to 350F. Spray a large (9X13) baking pan with cooking spray. Heat skillet or griddle pan sprayed with cooking spray on medium heat. Warm each tortilla about twenty seconds on each side, then place filling down center of tortilla. Roll up and place seam side down in baking pan. If tortillas tend to crack or tear, add some oil to the skillet while heating. Continue warming and filling all tortillas. Scatter extra filling on top. Pour enchilada sauce over top and sprinkle with shredded cheddar and sliced jalapenos. Bake for 20 minutes, or until cheese is bubbly.
Wednesday, October 14, 2009
Raising My Standards
Dining in Minneapolis seriously raises my standards for home cooking. But traveling means my home cooking has suffered. I ran out of food the other day, and while my zucchini soup was tasty it was not enough to satisfy and left me stuffing my face with cheese and crackers. My lentil salad was lackluster. When I finally made it to the store and refreshed my fridge, I decided to make a simple but incredibly satisfying pork chop with apple compote. A good dinner makes a huge difference in how I feel. I stop craving the great food in Minneapolis, I stop missing my old home. I feel a little better about where I am.
Pork Chops with Apple Compote
serves 4
1 tablespoon olive oil
4 center cut pork chops (thick cut)
salt and pepper
1 large shallot, minced
1/4 cup white wine
2 apples, sweet and crisp such as Gala, peeled and diced
1 cup chicken broth
2 tsp balsamic vinegar
I like to use thick cut pork chops because they don't get overcooked as easily. Season pork chops with salt and pepper on both sides. Add olive oil to large skillet and swirl to coat. Add pork chops before heating pan. Heating the pork chops more slowly allows them to retain more moisture and not dry out. They lose a lot of moisture when you add them to a hot pan. Heat pan on medium high heat. Cook chops until browned, about six minutes on each side, or more if very thick. Remove to a plate and keep warm in oven. You may need to cook chops in two batches.
While chops are cooking, peel and dice the apples and mince the shallot. After removing the pork chops, add shallot to pan and stir until brown. Add white wine to deglaze the pan, stirring to loosen the brown bits. Add chicken broth and diced apples. Simmer apples for ten minutes, until tender. Stir in balsamic vinegar and any accumulated juices from pork chops. Season with salt to taste.
Serve pork chops with apple compote on top. If pork chops have cooled off, return them to pan with apples for one minute to heat before serving.
Saturday, October 3, 2009
Totally Homemade And Only a Dollar
"Cupcakes! Water! Cupcakes! Water!"
As I approached, she pointed to her card table set in the grass at the corner of Lincoln and Ridge in Evanston. She had purple frosted cupcakes to sell - and it was a game day. Her white posterboard sign announced $1 cupcakes and $1 water bottles. It was the perfect breakfast for Northwestern students who are walking to the football stadium for an 11am game.
I was coming back from a tailgate where I had consumed a scone, a twinkie, and a brownie, so I immediately shook my head no. Then I reconsidered. I had to support a fellow baker, an entrepreneur, a 10 year old marketing genius.
"They're totally homemade and only a dollar!" she crowed as I forked over a dollar bill. I asked if she had anything for me to put it in because I wasn't going to eat it right away. She profusely apologized for not bringing tupperware. In my car I found some scrap paper and wrapped it around the cupcake, then nestled it in the hood of my windbreaker on the passenger seat. I had visions of purple frosted seats, but the cupcake held up to my erratic driving and I got it home safely.
It's not hard to please with cupcakes and they don't require special techniques. If you can whip up a buttery cake batter, if you can frost with the best of them, you can equally thrill a room of 2nd graders or a group of a bachelorettes. Only the second graders' cupcakes would have a cute frosting carrot on them while the bachelorettes' cupcakes should boast another frosted phallic object.
We make cupcakes not to aspire to high gourmet but because they can be eaten out of hand, a ready made serving that stays moist in its paper wrapper. We'll wave away that slice of cake claiming a diet but accept the cupcake because it's perfectly proportioned. It's modest, like the cute, quiet girl at the back of the classroom, not the bossy drama queen that is a four layer cake. It won't beg to be consumed, but its unassuming quality is light and satisfying.
That girl's totally homemade cupcake was nothing to get excited about. The white cake and sugary frosting was all a bit too sweet, and uninspired except for the purple of the frosting. But little girls making cupcakes and being entrepreneurs and big girls still eating cupcakes instead of fancy desserts is always worth at least a $1 to see.
Sunday, September 20, 2009
I Figure It Out
But do I know how to cook any specific cuisine? I don't know how to roll out pasta for raviolis. I'd be a mess filling a pan with layers of phyllo for baklava. I was afraid to buy lemongrass for a Thai curry because it looks like a houseplant. I don't really know how to cook anything when it comes down it. But I figure it out.
Hell, I don't even know how to do my job but I do it every day and get paid for it.
The cooking process starts hours, days, weeks before any particular dinner. It starts when I'm sitting at the table eating another delicious meal and flipping through a cookbook. With every recipe I read, I picture myself not only eating but actually going through the effort of cooking it. And if, in my head, I get more pleasure from eating than pain from cooking, I write it down, mark it with a post-it, add the ingredients to a grocery list, and away we go!
Maybe the book I'm perusing is my Complete Book of Indian Cooking, which has so many different ways to cook chicken in it that I read the titles out loud for a good five minutes before my dad made me stop. Maybe I'll come across a hot dry meat curry or some lamb kebabs, and decide I'm making them whether I know how to mold ground lamb to a skewer or not. Sometimes "not" is okay, because my oblong lamb meatballs were pretty tasty sans skewer. And the seemingly dull cherry tomatoes and baby onions sprang to life when salted and pan fried.
I don't need to know how to cook Indian food for this to work, and neither do you.
Mini Lamb Kebabs with Baby Onions and Tomatoes (The Complete Book of Indian Cooking)
Ingredients:
1 lb ground lamb
1 medium onion, chopped
1 teaspoon garam masala
1 teaspoon garlic pulp
2 medium fresh green chilies, chopped, and 4 fresh green chilies sliced
2 teaspoons chopped cilantro
1 teaspoon salt
1 tablespoon all-purpose flour
4 tablespoons corn oil
12 baby onions, peeled and trimmed (fresh pearl onions should be in onion section - do not use frozen!)
12 cherry tomatoes
Blend together the ground lamb, chopped onion, garam masala, garlic, 2 green chilies, cilantro, salt, and flour in a food processor. Process for about one minute, until mixture has a fine, blended texture. Break off small pieces and roll into balls or oblong kebabs. Place on broiler rack, with pan underneath to catch drippings. I like to line that pan with aluminum foil to making cleaning easier, otherwise burnt drippings can be a pain to scrape off. Baste the kebab meatballs with 1 tablespoon of the oil and place under broiler for 12 to 15 minutes, turning halfway through, or until evenly browned. Heat the remaining 3 tablespoons of the oil in a deep round-bottomed frying pan. Lower the heat slightly and add the whole baby onions. As soon as they start to darken, add the fresh chillies and tomatoes. Cook until tomatoes begin to brown. Remove the kebabs from the broiler and add them to the onion and tomato mixture. Stir gently for about 3 minutes. Transfer to serving dish and sprinkle with additional salt to taste. Serve with basmati rice and non-fat plain yogurt.
Tuesday, September 15, 2009
Easily Seduced
What's a girl to do?
A friend was telling me today about how wonderful her boyfriend is and how much she loves him, but doesn't feel about him the way she felt about her ex - who would take her back if she'd have him. And such is her dilemma, whether to go back to her passionate first love, who comes with a roller coaster of emotions, or settle in with a stable man who she has grown to love.
How do we choose what to eat every day, what we crave or what we have a taste for? What's just a momentary fling versus a recipe that stands the test of time? Who would have guessed that a simple spicy spinach pesto could woo me week after week, but the promising Ethiopian chicken would fall flat? And every once in a while I remember the summer I ate breakfast couscous every day, I couldn't get enough, and now it hardly seems worth the effort. But damn it was good at the time. I couldn't have predicted that roasted broccoli was impressive enough to introduce to my parents, or that roasted tomatoes would have my friends talking. The only thing they all might complain about in the end, is that I won't just settle down already with all the recipes I've collected rather than running around with new ones all the time. But I'll distract them with some homemade butter pecan ice cream on a slice of oatmeal cake. They can be seduced too.
I swear this pesto is better than any basil pesto. Giada's version has arugula but I prefer just spinach which is less bitter. Get a good olive oil for this, it contributes at least half the flavor.
Spinach Pesto (Adapted from Giada's Fusilli with Spicy Pesto on foodnetwork.com)
- 1 cup chopped walnuts
- 2 cloves garlic, coarsely chopped
- 1 (2-inch long) red or green jalapeno pepper, stemmed and coarsely chopped* see Cook's Note
- 2 cups grated (4 ounces) parmesan cheese
- 2 teaspoons kosher salt
- 1 teaspoon freshly ground black pepper
- 6 ounces baby spinach
- 1/4 cup extra-virgin olive oil
- 1 pound fusilli or penne pasta
For the pesto: In a food processor, combine the walnuts, garlic, jalapeno, cheese, salt and pepper. Process until the mixture is smooth. Add the spinach and process until blended. With the machine running, gradually add the olive oil.
Bring a large pot of salted water to a boil over high heat. Add the pasta and cook until tender but still firm to the bite, stirring occasionally, about 8 to 10 minutes. Drain and reserve about 1 cup of the pasta water. Place the cooked pasta and pesto in a large serving bowl. Toss well and thin out the sauce with a little pasta water, if needed.
Tuesday, September 8, 2009
Tool Kit
My gifts always come with apron strings attached.
I did slip an actual tool into the tool kit - a pair of kitchen shears. Kitchen shears are invaluable for cutting the skin off of chicken or cutting stew meat into smaller cubes. If you can't afford a good sharp knife, kitchen shears are a worthy investment.
Sending the recipes and the ingredients doesn't come close to capturing the joy of actually cooking for someone, especially someone like my brother who will lavish love and attention on a plate of meat. But tossing spices into the box was akin to sprinkling them into a stew and fitting tortillas and orzo into the box was like layering a lasagna. I arranged recipes and a shopping list as though preparing the mise en place. And I sealed that package like I was canning tomatoes or preserving fig jam for the long winter ahead.
I directed my brother via tool kit to make Tacos de Carnitas, a savory, slow cooked pork with highly concentrated flavor. It's great wrapped in warm corn tortillas topped with fresh tomatoes and onions, or fresh guacamole. The trick to this recipe? Follow it. Don't second guess it. For example, don't think you need to add more salt than it calls for. Just go with it.
Tacos de Carnitas
6 servings, 2 hours cooking time
2 1/2 pounds pork butt or beef stew meat
3 cups water
1 onion, diced
3 strips orange zest
3 cloves garlic, minced
1 bay leaf
1 teaspoon crushed red pepper flakes
1 cinnamon stick
1 teaspoon oregano leaves
1 teaspoon kosher salt
1/8 teaspoon ground cloves or 1 whole clove
12 small corn tortillas
Toppings: tomatoes, onions, cilantro, salsa, guacamole
Chop thick fat from outside of pork butt. Cut meat into 1 inch cubes. Combine pork with water, onions, orange zest, garlic, bay leaves, red pepper flakes, cinnamon, oregano, salt and cloves in a large pot. Heat to a boil, reduce heat to a simmer. Skim any scum that forms on the surface. Simmer until meat is very soft and falling apart, adding more water if necessary to keep the meat submerged, about 1 1/2 hours.
Season with additional salt to taste. Heat to a gentle boil; cook until the water has evaporated, about 30 minutes. Cook a little longer to fry the meat slightly, watching carefully to prevent burning. Remove bay leaves and cinnamon sticks. Remove any excess fat. Pull meat apart with forks if necessary. Fold a few tablespoons of carnitas inside each tortilla. Add your choice of toppings and serve.
Sunday, August 30, 2009
Dough Hook
It reminds of that urban legend about the couple that parked at Lover's Lane and heard on the radio about the escapee from the insane asylum with a hook in place of his hand. When they got home, they found a bloody hook hanging from the car door handle.
My dough hook looks kind of scary, and I'm a little worried about what mischief it will get up to while I'm sleeping. I wonder if it will be hanging from my bedroom door knob in the morning, all covered in yeast. Because it's actually a genius of a hook, smarter and wilier than the average kitchen appliance. I find that I evaluate my appliances, as if they are team members reporting to me. The crockpot is old and set in her ways, the toaster oven performs well but don't push his limits, the ice cream maker is fast and clever. And now I have a new stand mixer with a dough hook, and it's like the cool new guy everyone wants to get to know, who brings to the table some tricks to get the job done faster, better.
But whether or not you have a mixer with a dough hook, you must make some focaccia. Focaccia is easier to make than pizza because there's no sauce to worry about, and you need very little or no cheese. Simple toppings are best, focaccia doesn't have to be the main course, but it's good with salads or roasted veggies or a saucy pasta. This focaccia with Asiago and sea salt and cherry tomatoes was so simple and delicious that I nearly dropped my food in a rush to give you the recipe and insist that you make it. But I was stopped by the dough hook. It's a rather intimidating enforcer of dining etiquette.
Asiago Focaccia with Cherry Tomatoes and Kalamata Olives
Makes 1 10 inch focaccia
1 teaspoon active dry yeast
2/3 cup warm water
1 3/4 cups all-purpose flour
1 tablespoon olive oil
1/2 tablespoon salt
Toppings:
1 oz Asiago cheese, grated
4 to 6 cherry tomatoes, sliced thinly
8 to 10 kalamata olives, halved and pitted
4 basil leaves, chopped
Sea salt
Combine the yeast and warm water and let stand until the yeast is dissolved, about 5 minutes. Add flour, olive oil, and salt. Mix by hand or on low speed for about 1 minute to blend ingredients. Knead for about 10 minutes by hand or with the dough hook on low to medium speed until the dough is smooth and elastic. Transfer the dough to a well-oiled 10 inch cake pan and turn it over once to coat with oil. Cover with plastic wrap and let rise in a warm place for 1 1/2 hours.
Preheat the oven to 400 degrees F. Punch down the dough and spread to fill the cake pan. Drizzle with olive oil. Top with grated cheese, tomato slices, olives, and basil. Sprinkle liberally with sea salt.
Bake the focaccia until golden, about 25 minutes. Remove from pan to cool on a rack and serve warm or at room temperature.
Sunday, August 23, 2009
This Makes All the Difference
Those phyllo triangles in the front right corner - I made those, despite how I feel about phyllo. They were filled with mushrooms and cheese. I was told not to make anything for the party, but I insisted. That's how I roll.
This year, 31, wasn't quite worthy of the same level of celebration. It was, however, worthy of a cake. Earlier this summer, as I stood in line at Marshall's, I was unexpectedly wooed by a cookbook perched by the checkout. The title of the book was Great Cakes. Now I don't consider myself a cake person, but when a cookbook costs only $6 and boasts 250+ cake recipes, it's a no-brainer.
And now that I owned it, I decided I was making a cake for my birthday. Some people say I shouldn't make a cake for my own birthday, but I see no problem with it. It's not like I won't make a cake for yours! In fact, I would love to. Would you like Swiss Chocolate Silk or Black Bottom Mint Cheesecake? Graham Cracker Cake or Raspberry Ribbons? Holiday Honey Cake or Lemon Velvet Squares? There are over 250 to choose from.
I went with a cake called Double Trouble Fudge Cake, a two layer cake with a chocolaty nutty filling which I switched out for a raspberry filling instead. The cake itself was as good as any chocolate cake, but I what I want to tell you about here is the frosting and filling. Those two things can turn an average chocolate cake into a winner. It's like regular old "you" with a good haircut and clothes that fit well. Anyone who has seen an episode of What Not to Wear knows this makes all the difference.
The filling is easily made with frozen raspberries (1 1/2 cups), sugar (1/4 cup), lemon juice (2 T), and cornstarch (1 T) cooked briefly to combine and dissolve the sugar and cornstarch. The frosting is something like a chocolate ganache in its taste and texture. I swear it was just an ordinary cake underneath, but it was praised like no other. Or maybe that's just because it was free dessert.
Chocolate Custard Frosting
(yields about 3 cups, enough to fill and frost 2 9-inch layers, 3 8-inch layers, the top and sides of a 9X13X2 pan or a 10-inch tube cake.)
2 oz unsweetened chocolate, coarsely chopped
2 oz semisweet chocolate, coarsely chopped
1 tablespoon ground coffee
1/2 cup boiling water
1 cup sugar
3 tablespoons cornstarch
1/8 teaspoon salt
1 cup half-and-half
1 tablespoon unsalted butter
1 1/2 teaspoons vanilla extract
In a small heavy saucepan, combine the chocolates, coffee, and boiling water. Stir until the chocolate is completely melted and the coffee dissolved. In a separate small bowl, combine the sugar, cornstarch, and salt and add to chocolate mixture, stirring until blended. Slowly add the half-and-half, whisking gently until well combined.
Bring to a boil over low heat, stirring continuously with a wooden spoon. Cook gently about 1 minute longer, stirring occasionally, then remove from the heat. Off the heat, blend in the butter and vanilla. To cool quickly, set saucepan in cold water. Stir gently, do not beat, until icing is thick enough to spread. This will only take a few minutes.
Thursday, August 13, 2009
Contemplating Mini Pepperoni
Lately, the best things I've been eating have been simple, whipped up without much planning, centered around the fact that I bought something because it was fun. Why else would one buy a bag of mini pepperoni? It turns out that mini pepperoni last a long time, and once you've tried them in salad (not so great), or as a snack while making dinner (not satisfying), you're left with a 3/4 full bag of mini pepperoni. You feel like a CPG sucker. For those that did not attend business school or work in the industry, CPG stands for Consumer Packaged Goods, you know those companies that are always coming out with some new and improved product for you to squander your money on. It's always some variation on a product you already buy, with a minor tweak, like the dark chocolate version of Milky Way, or different shampoos for curls, sleek, or shine - and what if I want sleek, shiny curls? Yes, I do have several types in my shower.
So maybe, just maybe, there's a pattern here. But putting that point aside for the moment, I'd like to point out that the mini pepperoni did inspire me to make some homemade french bread pizzas. I always liked frozen french bread pizza, but am mostly opposed to processed foods (no that is not a frozen burrito in the freezer, what are you talking about?). And yet, it had never occurred to me to make fresh french bread pizza until I contemplated the mini pepperoni.
Now if you're going to make your own french bread pizza, you have to do it right. Get some freshly baked bread, or Take 'n Bake. I used tomato paste sauteed in olive oil with garlic, oregano, wine, and a dash of salt to make a quick pizza sauce. Use fresh mozzarella, shredded right over the sauced bread. Then throw on anything you have lying around - I used spinach, chopped figs, and of course, mini pepperonis. Bake for 10 minutes at 375.
I've never been so happy to eat french bread pizza. I made it three times, until I used up all my bread. However, I am still contemplating the remaining half bag of mini pepperoni. Ideas?
Tuesday, August 4, 2009
You Only Have to Be Taught Once
“Mommy mommy mommy,” she chanted. She’s not yet two years old, and her vocabulary is limited.
“Oh,” her mother Amy said from the chair where she sat nursing her younger daughter. “There she goes putting her foot on the table. I don’t know where she learns this behavior.” We all turned to observe Amy sitting sideways in her chair, one leg thrown over the stuffed armrest.
“Mommy!” her daughter announced.
We learn a lot from our parents, and not only how to sit at the kitchen table but also how to eat at it. My parents taught me about the joys of an English breakfast, a Thai Tom Yum soup, a kefta kebab. They taught me not only how to cut with a knife and fork so I could eat steaks, but also how to eat rice with my right hand (because we wipe ourselves with our left hand). They taught me that our family knows how to cook meat and fish and how to eat it – bones and all. They taught me how to suck the marrow out. They taught me to appreciate food.
Imagine that you’re five years old. Imagine that you have stomachaches all the time, and food is far less interesting than books and friends and weddings between your stuffed animals. Imagine you like hot dogs and corn pops and salty biscuits, but are picky about everything else. And then one day, you start eating goat curry. It’s meaty and spicy and suddenly the hot dog turns into the last kid picked for kickball. But you have to be taught to eat it correctly, to dip your chapatti in the curry and pick up a soft piece of meat, to chew every bit off the bone, and to seek out and call dibs on those fat bones filled with soft, buttery marrow. You are taught to suck the marrow out until it melts in your mouth. You only have to be taught once.
I can’t share the recipe for goat curry – for one thing, I don’t have it in writing. But I can tell you to go out and buy a lamb shank and make something like this Braised Lamb Shank with White Beans. It's a good, homey sort of meal, with the fat of the lamb cut by the hearty white beans. Season the meat and brown it in canola oil in a Dutch oven, then remove it. Saute some chopped onions, carrots, and celery in the oil, add some broth, and return the lamb to the pot. Braise on low heat for 2-2 1/2 hours. Then stir in some white beans mashed with lemon juice and cook another ten minutes, adding salt and pepper to taste. Serve yourself a lamb shank, and on it there should be a bone, like the one on the left side of my plate, that will be full of marrow. Suck it out, making a really loud slurping noise. That's how I do it. I show my appreciation for the food, and to my parents for a lesson well taught.
Monday, July 27, 2009
A Meal That Tastes Real
Which is just a damn shame.
And so every night, after the boiling and the braising and the peeling and the roasting AND the eating, I have a sink full of dirty dishes waiting for me, taunting me on the road to relaxation. Some nights I ignore them. It's okay, I live alone and if I ignore a dish it will not take revenge, except perhaps in the emission of odors (it's bad to ignore any dish that once held fish). Eventually though, I must face the music of the dishwasher - and yes, I do have a dishwasher so it may seem unfair to complain, but everything still needs to be detached from the caked on food. I do not have a garbage disposal, so my sink also requires a good cleaning now and then.
Tonight I decided to take a break. Although I am averse to frozen meals, Trader Joe's has some good food items (salsa verde, lox, olive tapenade, and double chocolate cookies are my favorites) and the short ribs looked good to me. But I remembered why I don't buy frozen meals when I ate the dish - the mealy vegetables and strange tasting sauce were not the best. And that is why I like to cook it myself.
I like having a meal that tastes real, like a sun tan not a fake bake. Like a documentary, not reality TV. Like real love instead of lust. It lasts longer, it's more satisfying, and it's more memorable. And sometimes it tastes so good, it makes me want to tell everyone about it, even if it's as common as oatmeal chocolate chip cookies or pasta with shrimp. Because even when real love is so common with all the couples that I know, I bet all of them think they're pretty special. And that the cooking is totally worth all the cleaning.
Pasta with Shrimp and Herbed Cream Sauce (from Giada's Kitchen)
4 to 6 servings
With recipes like this, you end up with leftovers of an ingredient like bottled clam juice, which you're never going to use up. My solution, because I liked it so much, was to make this dish again a few days later.
1 pound penne pasta
1/4 cup olive oil
1 pound medium shrimp, peeled and deveined
4 garlic cloves, minced
1/2 teaspoon kosher salt, plus more to taste
1/2 teaspoon ground black pepper, plus more to taste
1 15 oz can chopped tomatoes
1/2 cup chopped fresh basil
1/2 cup chopped fresh flat-leaf parsley
1/4 teaspoon crushed red pepper flakes
1 cup dry white wine
1/3 cup bottled clam juice
1/2 cup heavy cream
1/2 cup grated Parmesan cheese
Bring a large pot of salted water to boil over high heat. Add the pasta and cook until tender but still firm to the bite, stirring occasionally, 8 to 10 minutes. Drain the pasta and set aside.
In a large skillet, heat the oil over medium high heat. Add the shrimp, garlic, 1/2 teaspoon of salt and 1/2 teaspoon of pepper. Cook, stirring frequently, until the shrimp turn pink and are cooked through, about 3 minutes. Using a slotted spoon, remove the shrimp from the pan and set aside.
Add the tomatoes, 1/4 cup of the basil, 1/4 cup of the parsley, and the red pepper flakes to the skillet and cook for 2 minutes, stirring constantly. Add the wine and simmer for another 2 minutes. Add the clam juice and cream. Bring the mixture to a boil. Reduce the heat to medium-low and simmer for 7 to 8 minutes until the sauce thickens.
Add 1/4 cup of the Parmesan cheese, the cooked shrimp, the drained pasta, and the remaining basil and parsley. Toss together until all ingredients are coated with the sauce. Season to taste with salt and pepper. Sprinkle with remaining cheese and serve.
Saturday, July 18, 2009
Summer Comfort
Summer is supposed to be the time to shed all that extra clothing, baggage, or weight. We eat light foods like salads and seafood and fruit desserts. But what about when you have a car accident on a sunny day, or your summer fling breaks your heart, or the A/C stops working during a heat wave? Life is frustrating all the time, with no concern for the season. It’s not only the weather we seek comfort from in our food.
But food is not my primary source of comfort. My first love is reading. When I’m tired, when I’m stressed, when I’m lonely, there’s no better cure than to curl up in bed with a book. But I also realize that reading and eating are closely linked in my mind. Some people can’t use the bathroom without a magazine in hand, but I can’t enjoy my dinner or even a five minute breakfast without some reading material on the table. I used to read a book at the dinner table as a child, baffling and annoying my parents who love to talk. It was meant to be a compliment to the food. The better my mom’s cooking, the more I wanted to read while I ate it.
Seeking comfort on a cold, rainy day in June, I went to a used book sale. Wandering through stacks of books under a giant tent, I remembered long summer days in grade school where I had nothing to do all day but watch The Price is Right and I Love Lucy, and read piles of books – mysteries mostly. Now I was more interested in the cookbook section. Typically at these things you’ll find a variety of diet cookbooks, microwave cookbooks, and issues of Bon Appetit from 1983. Occasionally you’ll find something unique - like an African cookbook.
For $3, I bought a cookbook with recipes like beef tripe soup and clam and peanut stew, neither of which I plan to make. But I also came across a recipe for a cold cucumber soup. It was nothing more than a potato soup cooked, then pureed and chilled with some chopped cucumber stirred in, and a dash of pepper sauce. Summer is the only time of year I would want to eat cold soup.
When I made the soup, I was expecting something as simple as the recipe sounded, and I was a bit skeptical about chunks of cucumber in my potato soup. So I was surprised when I found myself licking my bowl (I don’t do this in public, I promise). The crunchy cucumber played off nicely against the creamy potato, and the cold soup was well heated by the pepper sauce.
This, then, is summer comfort. A good book, or a good cookbook, a cold, spicy, hearty soup, and the ability to lick your bowl clean without anyone watching.
Cold Cucumber Soup
Yields 2 quarts
Ingredients:
1 cup white onions, chopped finely
2 oz. butter
1 cup peeled and cubed white potatoes (1/2 inch cubes)
1 tablespoon salt
1/4 teaspoon white pepper
a few drops Tabasco (more if you like it spicy)
2 quarts chicken stock
1 cup fat free plain yogurt
2 cups peeled and diced cucumbers
In a 3 quart saucepan, saute the onions in butter. Add potatoes, salt, white pepper, tabasco, and chicken stock. Cook until potatoes are soft, about 20 minutes. Puree with immersion blender, or transfer to blender or food processor to puree until smooth. Return soup to pan. Add yogurt and cucumbers and stir to combine. Check the seasoning and adjust if needed. Chill 2 to 3 hours before serving.
Sunday, July 12, 2009
Certain Key Qualities
Every once in a while, you may get it into your head that you want to do something with phyllo dough. You'll think of flaky pastry stuffed with savory meat and cheese. You'll think of layers of phyllo and honey and nuts in baklava. You'll think of Greek themed meals with olives and flaming cheese doused in lemon, leading up to a large pan of spanikopita. Your ambition will get ahead of you and you'll buy not one but multiple boxes of phyllo dough, carefully follow the thawing instructions, and roll it out onto the table.
Think very carefully before you get to this point, because it takes cerain key qualities to work well with phyllo. Can you be patient, or do you skip the resting stage and cut right into your meat? Are you persistent, or did you give up making falafel because they disintegrated in the hot oil? Can you be graceful or do you constantly bump your knee against the table leg – the same knee and the same table leg every time you sit down for dinner? Maybe you can be. Maybe your patience is solid as a cheesy spinach filling. Maybe you have endless layers of persistence. Maybe your grace shines like an egg wash.
Or maybe you’re like me.
I can barely persist through this blog entry. I eat appetizers while making dinner. I bump my knee on the table leg – the same knee and the same table leg – every single day. And I struggle with phyllo dough.
But I must have some quality that takes me back to phyllo every now and then. Is it optimism, in believing that this time the process will go more smoothly? No, not even close. You see, no matter the messiness, no matter the trouble, at the end of the day phyllo wrapped packages with their tasty and varied fillings always receive praise and admiration. It's my ego that takes me back to phyllo again and again. Trying to impress by appearing cool and collected while presenting a platter of spinach and feta stuffed phyllo triangles to my guests, I anticipate their oohs and aahs. In reality, they must be thinking how crazy I am to work with phyllo when I could have just as easily impressed them with chips and dip.
Already, the dried out sheets crumbling to pieces and the sticky layers that wouldn't come apart are forgotten because the ego is satisfied. Phyllo, it muses, why that's nothing. But you'll notice, I never make such things when I'm eating alone.
Spanikopita
Ingredients:
2 pounds washed spinach, wilted
½ cup finely chopped parsley
½ cup finely chopped scallions
1½ cup finely chopped onion, browned
½ pound crumbled feta
2 T olive oil
1 package phyllo dough
5 beaten eggs
1 T dill weed
1 tsp oregano
1 T garlic
1 T lemon juice
½ cup salted butter
Salt and pepper
Preheat oven to 350° F.
Mix all ingredients except for phyllo dough. Grease a 9X12X3 inch baking pan. Layer phyllo dough then mixture, in twelve layers. Cut into squares. Bake at 350° F for 1 hour.
To make this spanikopita into phyllo triangles:
Brush a sheet of phyllo with melted butter and place a second sheet on top of it. Use a sharp knife to cut the sheets lengthwise into thirds. Place a mound of filling at one end of each strip. Fold dough over filling, forming a triangle. Continue folding, like a flag, until you come to the end of each strip. Bake at 350° F for 15-20 minutes.
Thursday, July 2, 2009
Cheese Whore
For as much as I love cheese, I’ve written very little about it here. Maybe that’s because I love cheese most in its purest untouched form. I love a creamy brie on crackers, goat cheese tossed onto salad, a slice of manchego with some prosciutto. When cooked into a lasagna it's hardly worth mentioning. But it’s often an ingredient in a recipe I want to try, so that around my apartment you'll find a magazine open to a page with feta chile dip or a cookbook bookmarked at a recipe for asiago cheese bread. In my fridge right now I have 8 types of cheese: cream, asiago, parmigiano reggiano, it’s weaker second cousin parmesan, boursin, feta, cottage and monterey pepper jack. This stock won’t stop me from wandering around Whole Foods' impressive cheese counter picking up and contemplating every kind of triple cream brie. That's the kind of woman I am. I'm a cheese whore.
I mean, just look at those jalapeno poppers, stuffed with cream cheese and scallions and topped with pepper jack, broiled to elicit a golden brown crispy cover. I'm salivating just looking at the picture, remembering the heat of the pepper tempered by the silken cream cheese that gushed out when I bit into it. I won't lie. I pulled crusted cheese off the foil and ate it. That crispy caramelized cheese is the best part.
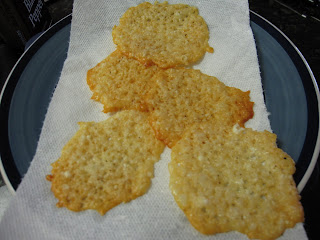
In fact, this crispy cheese makes the perfect snack by itself.
To make these Cheese Crisps, take a hard cheese like Asiago or Parm and shred a couple ounces of it. Sprinkle with some black pepper or cayenne for a little kick. Line a baking sheet with parchment paper and heap little mounds of the shredded cheese on it. Make sure to leave space between them because they will spread out when they melt. Heat the oven to 350 degrees and bake for about 7 minutes. When you pull them out they will still be soft for a few seconds. If you want to shape them into little cups, you may be able to do so but mine hardened up almost immediately. Ideally you would have time to drape them over a shot glass so they form cups which can be filled with something like a tomato cucumber salad or a chicken salad with grapes. And then you could serve them as a cute hors d'oeuvre at your next cocktail party.
I ate my cheese crisps unaccompanied, enjoying them in their purest form. But maybe they'd be good dipped in something, like the aforementioned feta chile dip. Cheese on cheese? Why not? That's the kind of woman I am.
Saturday, June 27, 2009
Pot Luck
Everyone loves a pot luck (at least if you have friends who can cook and or can bring the alcohol and tubs of Haagen-Dazs). In your typical foodie pot luck, you might see a tomato, basil and buffalo mozzarella salad, scalloped potatoes with blue cheese, or peach cobbler. The host will pull a hot roasted chicken out of the oven, or make a big vat of spaghetti bolognese. Three new year's eves in a row, my friends and I had themed pot lucks. The first year we had to make a "new" dish - something we had never made before, which resulted in homemade crackers with mushroom pesto, stuffed pork tenderloin, and a chocolate bombe cake. The second year, everyone had to bring a dish containing apples, and the third year our secret ingredient was nutmeg. The themes, the rules, and the competitive spirit (my dish has to be the best) of pot lucks are why I love them.
But a pot luck for the common, every day affair of lunch in the cafeteria was novel. I never thought of filling my tupperware with food to share. Because we were the only ones around that really cooked, or maybe because we were slightly selfish, the pot lucks were dubbed "Two Person Potlucks" and we kept them completely exclusive. Other coworkers would sit down with us at lunch and stare as we dolloped homemade salad dressing over abundant produce, or sliced slabs of lasagna in half. When you cook for yourself, you don't take as much care, but when you cook for another person, even if they're eating out of your tupperware, the effort you put into the food skyrockets. Suddenly I took more time to determine if the food I was bringing would be good, healthy, and interesting. That ruled out bologna sandwiches completely. Instead, I found healthy salads, hearty risottos, and one happy occasion for which I wrote a song, egg rolls.
Two Person Potlucks are only one of the things I miss about working in a place where I have real friends, people who support me and who listen no matter how many times I complain about my job. People who give advice when I don't know what to do, who believe I deserve better, and who will devour the food I bring them in plastic containers.
Here's a favorite from a Two Person Potluck. It's a perfect dish to take for lunch. Some advice on quinoa - washing it will drive you crazy because it sticks to everything. It's like styrofoam peanuts. You may want to skip that step.
Black Bean and Tomato Quinoa (Gourmet)
Makes 4 servings
Ingredients:
- 2 teaspoons grated lime zest
- 2 tablespoons fresh lime juice
- 2 tablespoons unsalted butter, melted and cooled
- 1 tablespoon vegetable oil
- 1 teaspoon sugar
- 1 cup quinoa
- 1 (14- to 15-ounce) can black beans, rinsed and drained
- 2 medium tomatoes, diced
- 4 scallions, chopped
- 1/4 cup chopped fresh cilantro
Whisk together lime zest and juice, butter, oil, sugar, 1/2 teaspoon salt, and 1/4teaspoon pepper in a large bowl.
Wash quinoa in 3 changes of cold water in a bowl, draining in a sieve each time.
Cook quinoa in a medium pot of boiling salted water (1 tablespoon salt for 2 quarts water), uncovered, until almost tender, about 10 minutes. Drain in sieve, then set sieve in same pot with 1 inch of simmering water (water should not touch bottom of sieve). Cover quinoa with a folded kitchen towel, then cover sieve with a lid (don't worry if lid doesn't fit tightly) and steam over medium heat until tender, fluffy, and dry, about 10 minutes. Remove pot from heat and remove lid. Let stand, still covered with towel, 5 minutes.
Add quinoa to dressing and toss until dressing is absorbed, then stir in remaining ingredients and salt and pepper to taste.
Sunday, June 21, 2009
For Old Time's Sake
Whether we cooked together or separately, everyone had their specialties. Somehow, I became responsible for salad dressings. It became my habit to dip into the condiment cabinet and fridge shelf, pulling out random vinegars, mustards, oils, or the occasional worcestshire sauce. I'd whisk them together, seasoning with salt, pepper, or lemon juice as I saw fit. Now at this point you might be thinking that salad dressing comes in a bottle labeled "Kraft" or "Hidden Valley" and resides in the refrigerator doorway, lasting for years all hyped up on preservatives. But why ruin a perfectly fresh, homemade salad with that? To quote Julia Child, "The perfect vinaigrette is so easy to make that I see no reason whatsoever for bottle dressings."
One of my standby dressings was a tahini dressing, which will help you use up the tahini you bought to make hummus. It's quite good on a salad of mixed greens, cucumber, red onion, and chickpeas, but it's basically quite good on any kind of salad or just as a dip for carrot sticks and the like. I usually whisk up a small batch in a bowl, but you could make a larger batch in a food processor or mini blender. The dressing is so memorable that when I recently made it to welcome my former foodie roommate back to Chicago, she recognized its creamy pale complexion instantly.
"Is that your tahini dressing?" she asked. When I acknowledged that it was, she was excited. I made it for old time's sake, but it was like bringing an old friend back into my life. It was just as good as I remembered and I'm happy to have it back gracing my table or huddling in the kitchen with me, making any ordinary salad taste phenomenal.
Tahini Dressing
Ingredients:
2 tablespoons tahini
3 tablespoons fresh lemon juice
1 large garlic clove, minced and mashed to a paste with 1/2 teaspoon salt
1/8 teaspoon cayenne, or to taste
1/3 cup olive oil
water to adjust consistency
In a blender, blend together the tahini, lemon juice, garlic paste, and cayenne. With the motor running, add the oil in a stream, blending until the dressing is emulsified. Add water to adjust the consistency to your liking. Season with additional salt if desired.
Tuesday, June 16, 2009
A good place for a date
In the same vein, I like to talk about all the dates I have. Some people have never had a date, and that is very very sad. The dates I had as a child were among the most memorable. I've had dates at Spanish restaurants and I've had dates in my own kitchen. Any place can be a good place for a date.
Dates of the gastronomical variety are rather like models of the mathematical variety. Not as sexy on the surface, but elegant and surprisingly useful. When I was young, I ate chewy date bars from the supermarket, packaged and processed but tasting like they were homemade. My mom liked them too, and we bought them all the time until suddenly they were discontinued - which is something like making a best friend at work only to have them quit. (The fact that I equate food to a best friend speaks volumes about how highly I value my friends.) At many a tapas bar, you can find bacon wrapped dates simply broiled, and why we pay so much for them is beyond me but they're delicious. Something about dates is mysterious and fascinating, maybe because they're under utilized, the bench player of the fruit squad, and by no fault of their own, often confused with prunes or figs.
As I wandered around the fruit section of the supermarket the other day, a shopping list held firmly in my hand, I spotted a little basket of dates. I was compelled to purchase them, with no particular recipe in mind, but a taste for chewy, sweet bars or bread in my mouth. But a week later those dates were still sitting on my counter making me feel guilty for buying them under false pretenses. So I hussled over to the computer and dug up a date bread recipe. Now the key to this recipe is not anything complicated in the ingredients of the bread itself, but the recommendation that you eat it with cream cheese. If you've had a cinnamon raisin bagel with cream cheese, you know what I'm getting at. The cream cheese cuts the sweetness of the bread perfectly. Use reduced fat cream cheese if you must, but put a thick layer on the bread. This is no time to skimp and ration. The cream cheese needs to be toothmark thick - which means it's thick enough that when you take a bite, you can see your toothmarks on the cheese.
I'm hoping for more dates in my life, of any variety. But this is a good place to start.
Date Nut Bread (Gourmet)
3/4 cup boiling water
1 1/2 cups chopped dates
1 tablespoon butter
1/4 cup brown sugar
1/4 cup molasses
2 teaspoons vanilla
2 large eggs
1 cup all purpose flour
1 1/2 teaspoons baking powder
1/4 teaspoon baking soda
1/2 teaspoon salt
1 cup chopped walnuts
Heat oven to 350°F.
In a medium bowl, pour hot water over dates and butter. Stir and let the mix sit until lukewarm. In a food processor, puree 1/3 of the mix to make a paste. Stir it back into the bowl full of date mix. Add the brown sugar, molasses, vanilla, and eggs. Stir until combined.
In a separate bowl, sift together the flour, baking powder, baking soda, and salt. Make a well in the center and pour in the date mixture. Mix. Pour the batter into a butter-greased loaf pan.
Bake for 60 minutes or so; loaf is done when the top has risen. Remove the bread from the oven and cool it on a rack for at least 30 minutes before serving.
Monday, June 8, 2009
You'll Be Fine
Several months ago I found a book called The Improvisational Cook at the library. The author Sally Schneider has a creative approach to cooking in that she does not use recipes. That's right, she just cooks on the fly. Which is how a real chef works, I suppose. You learn about foods and flavors and cooking techniques and when you have all these tools collected and polished and lined up, you can start inventing dishes of your own. For example, she'll tell you how to infuse oil with zest and garlic and chilis and then you can make a variety of oils to drizzle over salads or fish or fresh mozzarella.
Her idea for tomatoes was simple - roasting. I'm a huge proponent of roasting, and if I haven't told you about roasted broccoli yet then you haven't been talking to me enough because I talk about roasted broccoli the way some people talk about their children or their 401K plans. Roasting brings out the best in all vegetables. Tomatoes look like they're too weak and tender to stand up to roasting but you just have to know how to treat them.
You can roast any size tomatoes. I tried large beefsteak tomatoes (which are perfect for pureeing into soup, just roast some garlic alongside and blend it all together, then let it sit overnight to meld the flavors) and cherry tomatoes. The cherry tomatoes were much faster and naturally have more sugar to caramelize and create flavor. Here's what you need to do.
Preheat the oven to 275 degrees. Cut the cherry tomatoes in half and line them cut side up in a baking dish. Drizzle with olive oil and sprinkle with kosher salt. Bake for about an hour and a half. While you wait, you can sit around drinking your wine and telling your friends how good they have it to know you. But don't forget about the tomatoes. You know they're done when they are dark but not black, with a little sizzle and easily smashed. You can scoop them out into a bowl, but make sure to pour all that flavorful oil into the bowl too. The tomatoes become something like a chutney or compote which you can then put on pizza, pasta, or as I did - on bread spread with goat cheese.
It's not a recipe. It's just guidelines. If the oven temperature isn't exactly right, you'll be fine. If the timing isn't exactly right, you'll be fine. If you don't serve it the same way I did, you'll find another way, maybe even a better way. Let me know what it is.
Thursday, June 4, 2009
Crispy and creamy and crusty
There was a restaurant in St. Paul which my old group at Northwest, that hummus loving group, enjoyed going to. It was called Saigon, and was authentically Vietnamese, serving big, comforting bowls of pho. But I went there for the sandwiches. Sandwiches don't sound Vietnamese, but they have them as a result of French colonialism in South East Asia. They call them Banh Mi, which sounds more Vietnamese, and they're made like this.
Take a good baguette, or some kind of crusty French bread. Slather it with paté and mayo. Add some carrots (I made strips with a peeler) and sliced jalapeño peppers both pickled in rice vinegar. Top with some fresh cucumber slices. And make some peppery pork (recipe below) to slice up on the sandwich.
It wasn't a sandwich that sounded good to me the first time I was told I had to order it. The pho sounded good, lots of fat noodles and meat swimming in broth. But paté and mayo? Pickled vegetables? More pork on top? I was unsure.
But I've always been willing to try new foods. Not that I would eat dog or most insects, but in the realm of normal foods, I will try just about anything. Sometimes this leads to disgusting flavors I will never ever forget (e.g. gefilte fish, durian), but often it leads to amazing new flavor combinations. Wasabi blended in soy sauce. Candied ginger. Avocado white bean soup. Goat cheese with honey.
Why should these things not go together? Just because it hasn't become commonplace doesn't mean it can't be good. After all, the first time someone came up with a recipe for, say, lasagna, it may have gone like this:
Cook: Maybe I should mix up some meat and tomatoes and cheese.
Spouse: Why would you do that?
Cook: That's all I have left in the house. Oh and this flour that I can mix with water and egg to make dough. I'll just put the meat mixture between layers of dough.
Spouse: That sounds gross.
Cook: I'll put more cheese on top. Then it'll be good.
Spouse: You can't make me eat that.
And yet lasagna is much loved. How do we get from there to here unless I try something new?
It turns out that I loved the sandwiches, and not just because they were $2 each. And not just because my expectations were low. I loved how the ingredients from different cultures worked together and complemented each other. There were fresh crispy vegetables and creamy spread and crusty bread. Crispy and creamy and crusty, all in one package. I always ordered two, ate 1 1/2 and took the last half home to enjoy later. I miss that restaurant in St. Paul but I've heard about a good place in Chicago with Banh Mi. Until I get there, I found I can make Banh Mi at home.
Black Pepper Pork Banh Mi Recipe
1 pound of pork chops, shoulder or loin. Sliced thinly
2 cloves crushed garlic
2 table spoons of fish sauce
2 teaspoons sugar
1-2 tablespoons fresh ground black pepper. If you like the spice and flavor, add more!
2 tablespoons of finely chopped shallots or onion
1/4 cup vegetable or grapeseed oil
1 teaspoon of sesame seed oil
1. Mix all marinade ingredients (except for pork) in a plastic bag. Let all ingredients dissolve in oil, then add slices of pork. Allow everything to marinade for at least 1 hour.
2. Heat up frying pan, lay slices of pork, one layer at a time. When one side is cooked, flip to other side to finish cooking.
3. Assemble pork in your sandwich with condiments.
Tuesday, May 26, 2009
It's Like That
So I walked into Oil & Vinegar and was in heaven. On my right was a tasting table with tiny cubes of bread speared with toothpicks arranged on a plate and surrounded by plastic cups filled with vinegar. Another tasting table held cups of oil. Yet another had tastings of salad dressing. The back corner of the store had large vessels holding the oils and vinegars, and empty glass decanters were available for purchase and filling. Oil and vinegar on tap! The Turkish store manager had endless suggestions for every type of oil in his store - use the lemon oil on fish, rosemary infused oil for lamb, or walnut oil in a salad dressing. I wanted to be invited over for dinner. The store had other fun foods too, like specialty chocolate, flavored pasta (squid ink pasta anyone?), fig spreads, honey, spices mixes and rubs, olives, pickles and tapenades. All these foods that make me think of decadence, luxury, and concentrated flavor that satisfies on first taste and doesn't require stuffing myself.
But I wanted to stuff my shopping bag. I restrained myself and picked a only a single delicious white truffle balsamic vinegar to bottle and take home. That night I sprinkled it over a salad of mixed greens, granny smith apples, and goat cheese, letting the cheese soak up a good amount of vinegar. The white truffle adds depth to the balsamic vinegar and would also be delicious as part of a pan sauce for meat.
But if you're going to buy a good balsamic vinegar, there is one thing you must do with it - make dessert. Get some good strawberries or blackberries. You can soak them in the vinegar raw, or cook them down a bit and add the vinegar in to make a compote. Then go into your freezer and find that ice cream you've stashed. I know you have some in there. You don't? That's even better, because then you can get out the ice cream maker and make some almond ice cream in no time. Take a basic vanilla ice cream recipe which requires no cooking, and add in the same amount of almond extract as there is vanilla extract before pouring it in the ice cream maker. When the ice cream is almost frozen, add some chopped toasted almonds. Now serve up a scoop of the almond ice cream with a spoonful of your balsamic vinegar fruit mixture. Drizzle some extra balsamic over the ice cream, and if you're wondering now whether vinegar is really meant to be with ice cream, just put your mind at ease and try a spoonful. And then stock up on vinegar.
Sunday, May 24, 2009
Brunch
Brunch is probably my favorite meal of the day. I say probably because if you ask me the question while I'm devouring creamy broccoli mascarpone soup, then soup would be my favorite meal. And if I happen to be savoring a spoonful of almond ice cream then dessert would be my favorite meal. And I have a weakness for appetizers, canapés, and foods that are cute.
But when no immediate food is set before me and I can state an unbiased opinion, brunch is always my favorite meal of the day. It's my favorite meal to go out for, it's my favorite meal to cook, and it's my favorite time of day to eat. Mid-morning my appetite is at its peak.
My friend Huzefa once asked what exactly defined brunch. Brunch doesn't exist in India where he grew up, and he wanted to know why we had to go out for brunch instead of lunch. Technically brunch is defined as a meal that replaces both breakfast and lunch. Eating anything before it qualifies your second meal of the day as lunch, not brunch. But brunch connotes so much more than that. It is hot tea and croissants and smoked salmon and cream cheese bagels and fruit. It is pancakes and waffles thick with syrup and whipped butter. It is wearing wool sweaters in January and waiting 45 minutes for a table at a favorite restaurant that never has enough tables but has wild rice porridge on the menu. It is sitting outside on a summer day eating an organic egg omelet and free range chicken sausage. But most of all, it is making something at home as simple as challah french toast.
Brunch is scents too, the smell of coffee, of cinnamon rolls, of sizzling bacon, of banana bread. It's good in the rainy season, it's good on a snowy Christmas morning, it's good on a hot summer day when all you can eat is a cold plate of deli meat and cheese and fresh berries. Have you noticed that just about anything qualifies as brunch food? No wonder Huzefa was confused - brunch couldn't be defined as a particular food so much as a particular feeling. It evokes coziness and satisfaction.
Maybe I love brunch because it means it's the weekend and I can take things easy, sleeping in a little and then eating good food. What could be better than that?
Strawberry Cinnamon Muffins
*Don't be afraid to add plenty of strawberry jam because it won't seem like enough after they're baked.
Friday, May 15, 2009
Day In Day Out
Fast forward to 2005. I had just started my job at Northwest Airlines in the international route planning group. My group was small, close, and we talked about the food we like all the time. My director had a heart attack a few years earlier and followed a strict diet, but hummus was allowed and was one of his favorite foods. Being the savvy employee that I was, I whipped up a batch one day and brought it in.
That was it. I was the hummus queen. At most offices people bring in cookies, brownies, or other baked goods. I brought in hummus. If in fact I dared to bring in something less healthy, my director chastised me and asked me when I was making hummus again. Even when I was invited over to his place for a cocktail party, I was instructed to bring the hummus. My director was the kind of person who had a very strong opinion about right and wrong and my hummus was all that was right with the world. It was healthy and flavorful, filling but light, and had the perfect balance of garlic and lemon. It could be a snack or a meal, eaten with carrot sticks or crackers or bread.
A bacon cheeseburger, on the other hand, was all that was wrong with the world.
I still think hummus is one of the easiest things to make myself, but others have had problems when using my recipe. I swear it's not a recipe that magically changes ingredients and quantities for the recipient à la Harry Potter, so that only the original owner can make it well (but wouldn't that be cool?). Hummus is one of those amazing foods that is made up of things that don't taste particularly good by themselves. Chick peas aren't bad, though a bit dry and bland. Raw garlic is pungent, lemon juice is not a popular beverage. And if you've never tasted tahini, don't bother. It's a gluey, bitter sesame seed paste. I put all the ingredients into a food processor, adding salt and a dash of cayenne. Olive oil is added in a stream until the chunky mixture turns soft as whipped butter. Then it's packed in a tupperware to take to work, sliding sloppily up the side, crackers stashed in a zip lock bag. My presentation of the hummus is a bit different from Pita Inn's. But it's just as good.
Hummus
2 garlic cloves
1/2 tsp salt
1 15 ounce can chick peas
1/3 cup tahini
1/8 cup lemon juice
1/4 cup olive oil
1/4 cup water
Mash garlic with salt. Add to food processor, add remaining ingredients through lemon juice. Pulse to blend, then add olive oil in a stream with the processor running. Add a little water at a time until thinned to a consistency you like.
Saturday, May 9, 2009
Choosing Between Your Children
"What's in this?"
"Butter, sugar, flour-"
"Ok, you had me at butter and sugar!"
It's really no secret by now that I love butter and sugar too. I greatly prefer cookies to cakes because the butter and sugar to flour ratio is higher. A brownie sitting next to a cupcake and I go for the brownie every time. But don't make me choose between cookies and ice cream. It's like choosing between your children, it's simply impossible.
So today I'm going to talk about both my favorite cookie recipe and one of my favorite ice cream recipes. Desserts are back on the table, and in case you think I'm not eating my vegetables I'll have you know I had a hearty serving of brussel sprouts yesterday. Braised in cream of course. (It's either that or roasted with bacon and I believe the cream has more redeeming qualities.) But I digress.
I'll start with my favorite cookie recipe because at one time it had me bemused and befuddled. My roommates and I had two recipes with the same name: Chocolate Espresso Cookies. One was in Bon Appetit and one was in Gourmet. One recipe was sublime and the other was...like slime. Well it didn't taste bad but it didn't produce a nice cookie, it just made a mess on the baking sheet. The problem was that my roommates and I had made them both and didn't know which had given us the amazing cookie and which has given us the mess.
Only one thing to do: make more cookies.
The correct recipe (from Gourmet) turns out these beautiful cookies - soft, chocolaty, only a hint of espresso for those of us who don't like it but enough to enhance the chocolate flavor, and a shiny, crackly top. No one can eat just one. That's because the recipe starts by having you melt a lot of chocolate with a lot of butter. After you've mixed that with your eggs, sugar, and espresso, you just add a bit of flour, salt, and baking powder and load it up with more chocolate in the form of chips. This is one of those never fail recipes. Everyone loves it. You just can't go wrong with that much butter and chocolate.
The only possible thing that could make a cookie like this better is to top it with ice cream.
A girl with an ice cream maker is not to be ignored. She will tease you and tempt you with creamy, unusual delicious flavors like blueberry cheesecake, brown sugar, or lemon custard. There will be forays into peanut butter, pumpkin, peaches and cream, caramel, and vanilla bean. Ultimately she will take you down with a peppermint ice cream the color of cotton candy eaten before a carnival ride or the Pepto Bismol taken immediately after. There's just something about a pink ice cream that begs to be eaten in abundance, leaving sticky pink smears around your lips and drips on your shirt.
I got the peppermint ice cream recipe from my friend Ann who got it from her sister-in-law. It's also good with brownies - really anything chewy and chocolately will do. Maybe not a tootsie roll though...
As for the shortbread recipe that won accolades for its butter and sugar proportions, I'm still working out whether it's the best I can find. I have a feeling my efforts will be appreciated.
Chocolate Espresso Cookies (Gourmet)
3 ounces unsweetened chocolate, chopped
2 cups (12 ounces) semisweet chocolate chips
8 tablespoons unsalted butter, cut into pieces
3 large eggs
1 cup plus 2 tablespoons sugar
2 1/4 teaspoons finely ground dark-roast coffee beans, such as Italian-roast
3/4 cup all-purpose flour
1/3 teaspoon baking powder
1/4 teaspoon salt
Preheat oven to 350°F and grease 2 large heavy baking sheets.
In a double boiler or a metal bowl set over a saucepan of barely simmering water melt unsweetened chocolate, 1 cup chocolate chips, and butter, stirring until smooth, and remove top of double boiler or bowl from heat. In a bowl with an electric mixer beat eggs, sugar, and ground coffee on high speed until very thick and pale and mixture forms a ribbon when beaters are lifted, about 3 minutes, and beat in chocolate mixture. Into mixture sift in flour, baking powder, and salt and stir until just combined. Stir in remaining chocolate chips.
Drop batter by heaping tablespoons about 2 inches apart onto baking sheets and bake in batched in middle of oven 8 to 10 minutes, or until puffed and cracked on top. Cool cookies in baking sheets 1 minute and transfer to racks to cool completely.
Peppermint Ice Cream
1 cup whole milk
3/4 cup sugar
2 cups cream
1/2 tsp vanilla
1 tsp peppermint extract
3/4 cup crushed hard peppermint candies
Red food coloring optional
Whisk the milk and sugar until sugar is dissolved. Stir in cream, vanilla and peppermint extract. Thicken in ice cream maker for 25-30 min, then add crushed peppermint in final 5 minutes of mixing. Freeze for several hours before serving.